Now, lets say you want to open a new project for a new movie.
Now, if you are shooting in HD , it's going to be much different than shooting in SD.
Now, i will show you how to make your own project settings that work perfectly for the camera you are shooting on. Because for example, if your camera is shooting with a frame rate of 24 frames per second(Cinema) and you choose a setting which includes 30 frames per second , you are going to have to render your project even though you have no effects on it. So, it's completely a waste of Hard Drive Storage and computer power , and off course a huge waste of time.
Now when you open premiere this is what will show up :

Now , just click New Project to make new settings or you can just open an existing project by clicking on ''Open Project'' , but to make your new settings for your camera , click on New Project, and this will show up:

Now over here , the only thing i suggest you do , is change the Capture format to HDV or DV depending on your camera and when you click on scratch disks , this will show up:

Now , in here , you can pick what you want your project to be rendered in . For example , i like to render my project in Local disk D because it has more space , so i recommend changing to the disk with a higher capacity , now to change the disk , just click browse , and pick the disk you want but remember to pick it for all of the following : Captured video; Captured Audio; Video Previews; Audio Previews.
Then , name your project and press OK, and this will show up :

Now, this is the important part . When you have a project , you can have several sequences , but each sequence has different settings. For example , my camera is an AVCHD camera that shoots in 1080i and i shot it with 30 frames per second which is equal to 29.97 frames/second so i pick that setting.
Now , remember to check the frame rates on your camera and the resolution to pick the specific and right setting.
And then hit OK , so this will show up:

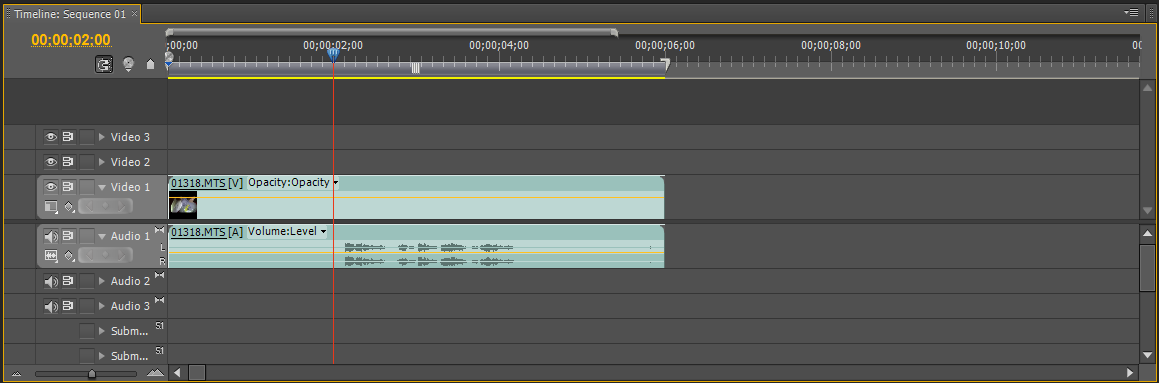
So, then import your footage that works with your settings, and then insert it in your timeline and this is what you will see :

Okay , now what you see is a yellow line above your footage instead of a red line . This yellow line makes things smooth so you can play your footage in real time. But if you see a red line , that means your settings don't work with your footage and it will be very hard and rough to view your footage.
And that's all, make sure to contact me at Karims27@hotmail.com.
Thank you for reading this post,
Karim
Now, if you are shooting in HD , it's going to be much different than shooting in SD.
Now, i will show you how to make your own project settings that work perfectly for the camera you are shooting on. Because for example, if your camera is shooting with a frame rate of 24 frames per second(Cinema) and you choose a setting which includes 30 frames per second , you are going to have to render your project even though you have no effects on it. So, it's completely a waste of Hard Drive Storage and computer power , and off course a huge waste of time.
Now when you open premiere this is what will show up :

Now , just click New Project to make new settings or you can just open an existing project by clicking on ''Open Project'' , but to make your new settings for your camera , click on New Project, and this will show up:

Now over here , the only thing i suggest you do , is change the Capture format to HDV or DV depending on your camera and when you click on scratch disks , this will show up:

Now , in here , you can pick what you want your project to be rendered in . For example , i like to render my project in Local disk D because it has more space , so i recommend changing to the disk with a higher capacity , now to change the disk , just click browse , and pick the disk you want but remember to pick it for all of the following : Captured video; Captured Audio; Video Previews; Audio Previews.
Then , name your project and press OK, and this will show up :

Now, this is the important part . When you have a project , you can have several sequences , but each sequence has different settings. For example , my camera is an AVCHD camera that shoots in 1080i and i shot it with 30 frames per second which is equal to 29.97 frames/second so i pick that setting.
Now , remember to check the frame rates on your camera and the resolution to pick the specific and right setting.
And then hit OK , so this will show up:

So, then import your footage that works with your settings, and then insert it in your timeline and this is what you will see :
Okay , now what you see is a yellow line above your footage instead of a red line . This yellow line makes things smooth so you can play your footage in real time. But if you see a red line , that means your settings don't work with your footage and it will be very hard and rough to view your footage.
And that's all, make sure to contact me at Karims27@hotmail.com.
Thank you for reading this post,
Karim
No comments:
Post a Comment