Now, windows live movie maker is one of the most basic editing programs, but it is very helpful. If you want to make a home movie by just putting in all of your childhood memories for example, then movie maker is great. If you want to make a vlog or skit on youtube , movie maker is great.
P.S: I used to use movie maker a lot but i switched because i wanted to know more in the world of editing, however, many people are satisfied with movie maker because its so simple and easy to use and i agree with them.
Now in this blog post , i will give you the basics on windows movie maker(Latest version)
Tutorial for the old version of movie maker: http://teachingyouaboutyourpc.blogspot.com/2011/12/how-to-use-movie-maker-26-tutorial.html
Now, when you open windows movie maker , this is what you see:
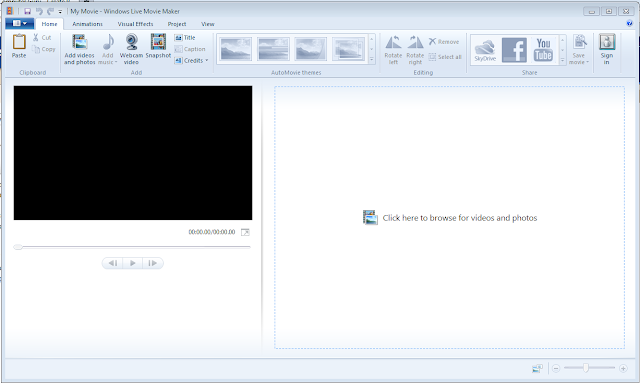
Now, The first thing you have to know is how to import footage or pictures by clicking ''Add videos and photos'' and when your footage is imported , you can add music by clicking ''Add music'' which is right- next to the ''Add videos or photos'' button. And next to both of them , you have the webcam video button , which you can take video from your webcam but remember to add a webcam first to your computer or make sure that your laptop has a built in webcam . And next to that you ''Snapshot'' which is a very important feature and the whole point of this snapshot feature is to take a frame out of a video you imported and take it as a picture and here is how it works:
First , import your footage:

And then , you select a certain frame in your footage and then click ''Snapshot'' and then it will open a window so you can save it in a specific file. And then , that certain frame will be a picture.
Okay, now that we are done with the snapshot , we have automovie themes, now the only thing these do is add different kinds of intros and outros.
And you can also rotate right and left for a specific footage that you imported and remove a selected footage and selecting the whole project to add the same effect for all the footage in it or even deleted the whole project by pressing select all and then remove.
And then you have some social media buttons like youtube , facebook.. And what this does is upload your project to that specific social media site (for example, uploading your project to youtube so the world can see your work.
Now, you are on the home page but there is a page that is as important which is ''Animations''. Now, basically this another name for ''transitions''.
Now, if you don't know what transitions is , it is like a cool effect at the beginning of the project or between two single footage, for example , a fade effect.
And in the animation box , you can animate footage by rotating it or making it move to the right or left and many other animations
And you also have visual effects : Now you can try them all easily by just pressing on that single visual effect like black and white and color grading.
Then , when you click on the project tab , you have the option to pick whether you want your project to be widescreen or standard, however, if you have 1080 or 720 picture or video , you are going to have to pick it widescreen and if you have 480 then you are going to have to pick standard. And in the project tab, you also have audio mix , now this is a simple feature to put how loud you want your audio to be in the video. And you have fit to music which is an automatic feature by windows movie maker which cuts your video to make it go with the beats of the music you added onto your project.
And then, you have the the view , which is very easy task where you can zoom in or make your footage full screen....
Now, once you are done with your project, you can upload it to youtube or facebook by going back to home and clicking on the youtube or facebook logo or you can save it on your computer by clicking on that little file logo at the top and then clicking save movie , and then they will give you a few options on how you want to export it .
Now, thats all you have to know about windows live movie maker , it is a basic program which is very easy to use . I will make a tutorial on the old version soon.
For more information , contact me at karims27@hotmail.com.
Thank you for reading this blog post.
P.S: I used to use movie maker a lot but i switched because i wanted to know more in the world of editing, however, many people are satisfied with movie maker because its so simple and easy to use and i agree with them.
Now in this blog post , i will give you the basics on windows movie maker(Latest version)
Tutorial for the old version of movie maker: http://teachingyouaboutyourpc.blogspot.com/2011/12/how-to-use-movie-maker-26-tutorial.html
Now, when you open windows movie maker , this is what you see:
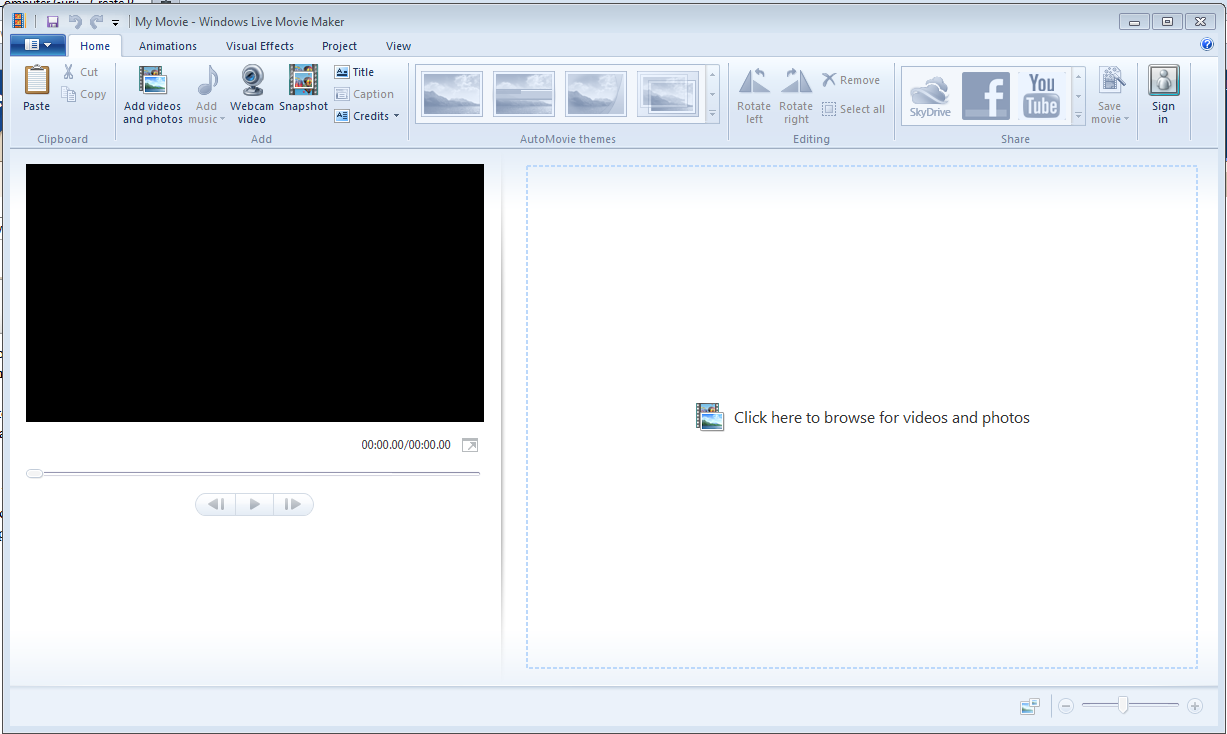
Now, The first thing you have to know is how to import footage or pictures by clicking ''Add videos and photos'' and when your footage is imported , you can add music by clicking ''Add music'' which is right- next to the ''Add videos or photos'' button. And next to both of them , you have the webcam video button , which you can take video from your webcam but remember to add a webcam first to your computer or make sure that your laptop has a built in webcam . And next to that you ''Snapshot'' which is a very important feature and the whole point of this snapshot feature is to take a frame out of a video you imported and take it as a picture and here is how it works:
First , import your footage:
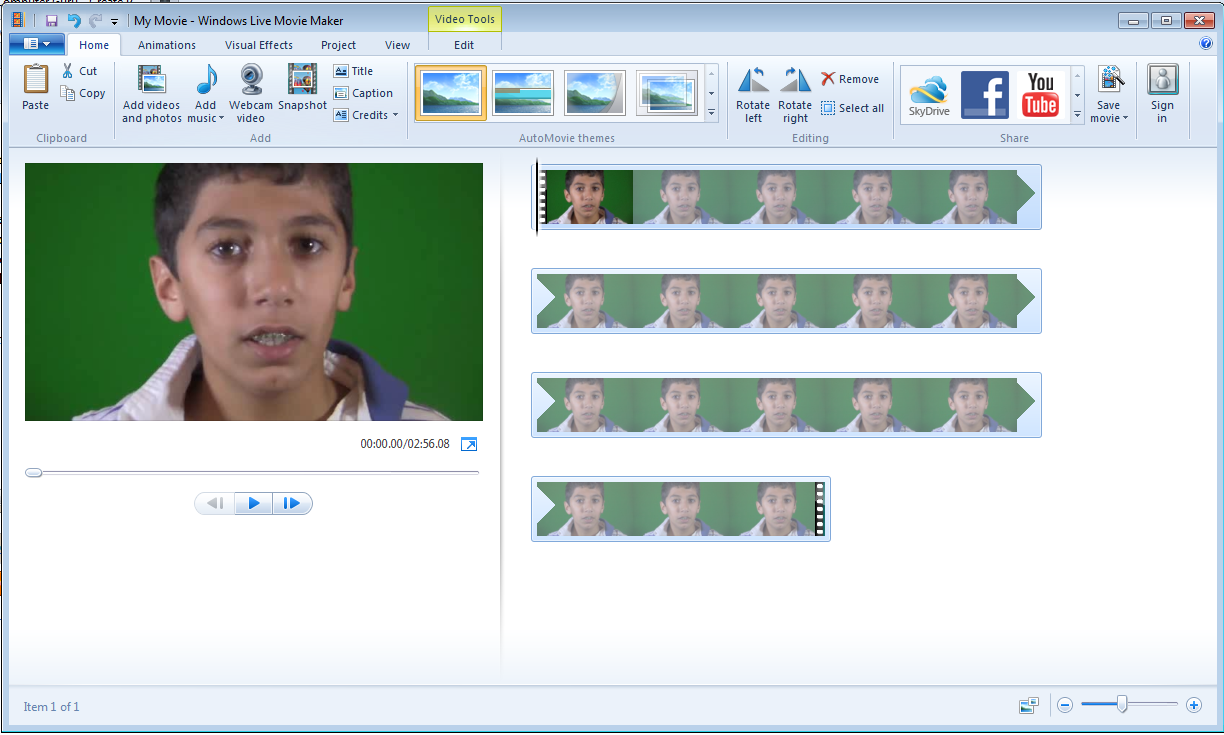
And then , you select a certain frame in your footage and then click ''Snapshot'' and then it will open a window so you can save it in a specific file. And then , that certain frame will be a picture.
Okay, now that we are done with the snapshot , we have automovie themes, now the only thing these do is add different kinds of intros and outros.
And you can also rotate right and left for a specific footage that you imported and remove a selected footage and selecting the whole project to add the same effect for all the footage in it or even deleted the whole project by pressing select all and then remove.
And then you have some social media buttons like youtube , facebook.. And what this does is upload your project to that specific social media site (for example, uploading your project to youtube so the world can see your work.
Now, you are on the home page but there is a page that is as important which is ''Animations''. Now, basically this another name for ''transitions''.
Now, if you don't know what transitions is , it is like a cool effect at the beginning of the project or between two single footage, for example , a fade effect.
And in the animation box , you can animate footage by rotating it or making it move to the right or left and many other animations
And you also have visual effects : Now you can try them all easily by just pressing on that single visual effect like black and white and color grading.
Then , when you click on the project tab , you have the option to pick whether you want your project to be widescreen or standard, however, if you have 1080 or 720 picture or video , you are going to have to pick it widescreen and if you have 480 then you are going to have to pick standard. And in the project tab, you also have audio mix , now this is a simple feature to put how loud you want your audio to be in the video. And you have fit to music which is an automatic feature by windows movie maker which cuts your video to make it go with the beats of the music you added onto your project.
And then, you have the the view , which is very easy task where you can zoom in or make your footage full screen....
Now, once you are done with your project, you can upload it to youtube or facebook by going back to home and clicking on the youtube or facebook logo or you can save it on your computer by clicking on that little file logo at the top and then clicking save movie , and then they will give you a few options on how you want to export it .
Now, thats all you have to know about windows live movie maker , it is a basic program which is very easy to use . I will make a tutorial on the old version soon.
For more information , contact me at karims27@hotmail.com.
Thank you for reading this blog post.